
Media2URL
Edit a stored image in the browser

Make the image fit what you need next

An uploaded image is often close to finished already. A screenshot can have too much empty space around it, a product photo can be the wrong size for a website card, or a social image can need one label before it is ready to share.

The Media2URL Image Editor lets you work on supported images already stored in your workspace. You can crop and resize them, make visual corrections, add text or other layers, then decide whether the finished result should replace the current file or stay beside it as another version.

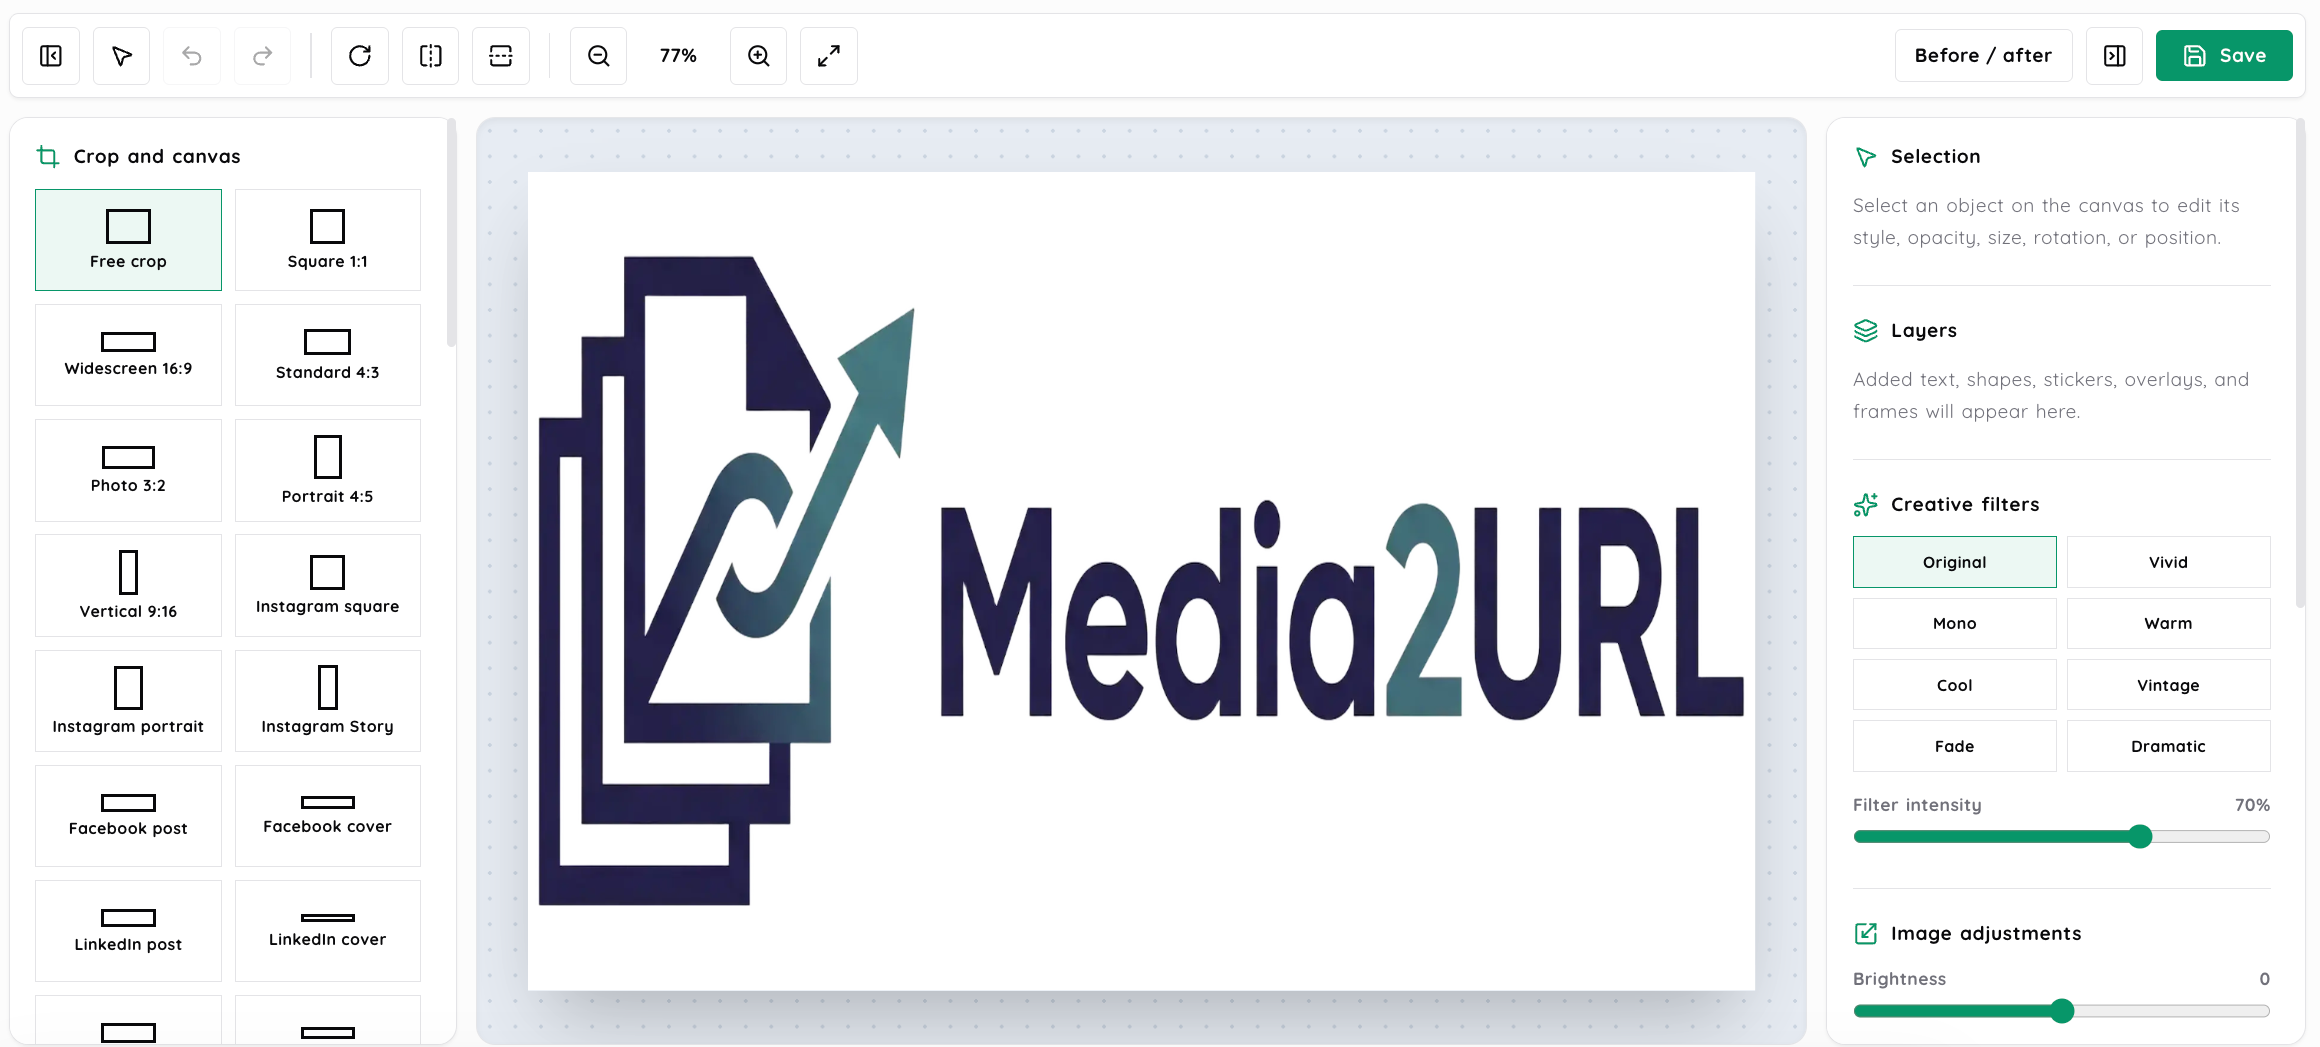
Media2URL Image Editor showing the actual logo image on canvas, with Free crop selected, crop presets, layer controls and creative filters visible
Crop presets, the image canvas and editing controls stay visible together in the workspace.
The workflow

Most edits start with one simple problem

A support screenshot does not need the same treatment as a campaign graphic. One might only need a crop and an arrow, while the other could need a different size, text, a watermark and another export format.

The easiest way to work is to fix what is actually wrong with the image first. Everything else can stay untouched.

  1. 1

    Open the image from your library

    Choose a supported image already stored in your Media Library and open it in the editor. There is no need to download the image, make a small change somewhere else, then upload it again just to continue working with the same asset.

  2. 2

    Fix the shape and size first

    Crop, resize or straighten the image before adding the smaller visual details. If the final destination expects a particular shape, getting the canvas right first also makes the later text and overlays easier to place. Custom pixel dimensions are available within the current editor limits when a destination gives you an exact width and height.

  3. 3

    Add only what the image actually needs

    You can work with adjustments, text, drawings, shapes, overlays and other supported elements after the basic image is in place. Those added elements remain on separate layers while you are editing, which makes it easier to move a label, hide a watermark or adjust an arrow without rebuilding the whole image.

  4. 4

    Check the result before you save it

    Undo and redo help when an edit goes wrong. Zoom is useful when you need to inspect a small detail, while the before and after view gives you a better sense of whether the changes actually improved the image. Once the result looks right, export it as JPEG, PNG or WebP and choose the save option that fits what should happen to the original asset.

Cropping and sizing

The final destination usually decides the shape

A crop does more than remove unwanted edges. It changes how the subject sits inside the space where the image will eventually appear.

A product photo used inside a square catalogue card needs a different frame from the same photo used in a wide video thumbnail. A portrait social post creates another shape again.

The editor includes common ratios such as 1:1, 16:9, 4:3, 3:2, 4:5 and 9:16, along with preset sizes for several familiar publishing layouts.

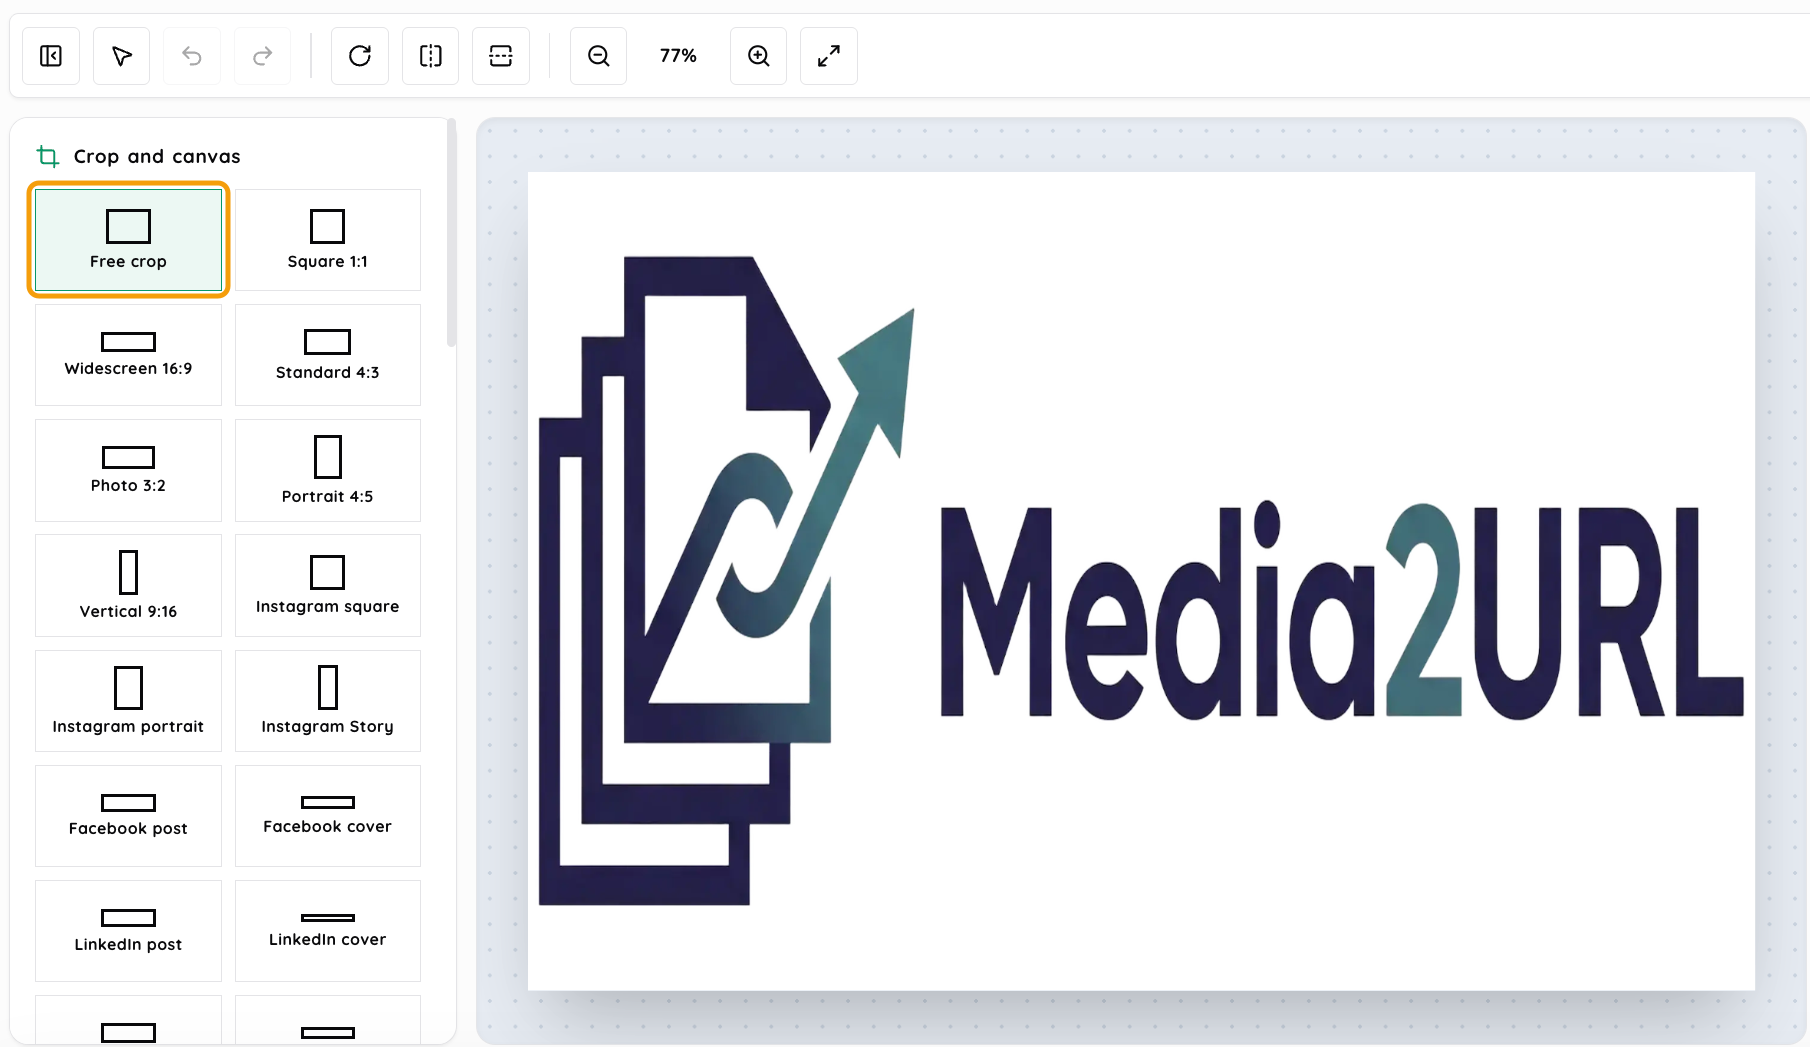
Image Editor with Free crop selected, aspect-ratio and social crop presets beside the Media2URL logo canvas; an amber outline marks the selected preset
Free crop is selected; the amber outline points to that control among the available aspect-ratio presets.

Preset group examples

Preset groupExamples available in the editor
General ratios1:1, 16:9, 4:3, 3:2, 4:5 and 9:16
Social postsInstagram square and portrait, Facebook feed, LinkedIn feed and X post
Large headersFacebook cover, LinkedIn cover, X header and YouTube channel banner
Web contentYouTube thumbnail and 1200 × 630 blog or Open Graph canvas

These presets are useful starting points inside the editor. Social platforms can change their own recommended dimensions or safe areas, so an important campaign image should still be checked against the destination before it goes live.

Crop, resize and canvas size change different things

Cropping removes part of the visible image. Resizing changes the dimensions of what remains.

Changing the canvas controls the final working area around the content, which becomes useful when the image needs more space instead of less.

For example, you could crop a landscape product image into a square for a catalogue. Another version of that same source could use a wider canvas for a YouTube thumbnail without forcing the square version to become your only copy.

Correct the image before styling it

Sometimes the image itself needs attention before any creative effect is added.

Brightness can help when the source is too dark. Contrast changes the separation between lighter and darker areas, while saturation affects colour intensity. Temperature can move the image towards a warmer or cooler appearance.

Sharpness and clarity are useful when important edges need more definition. Blur serves another purpose and can soften detail or obscure part of an image, while opacity controls how strongly a layer appears over the content underneath.

Grayscale and other creative effects are available when the image is meant to have a particular look rather than simply needing correction.

Filters do not have to be all or nothing

The editor includes looks such as Vivid, Mono, Warm, Cool, Vintage, Fade and Dramatic. Each effect has an intensity control, so you can reduce the strength instead of accepting the full effect exactly as it appears by default.

Texture overlays can add a grid, diagonal pattern, halftone look, scanlines or a vignette. Frames include choices such as a simple border, stronger outline, double line, photo style matte or cinema style bars.

These options make more sense for thumbnails and promotional graphics than for every image. A documentation screenshot usually works better when the visual stays simple and the important part is easy to see.

Annotations and layers

Sometimes the image only needs to point at something

A screenshot in a support message can be difficult to understand even when the problem is clearly visible to the person who captured it.

A rectangle around the wrong field or an arrow pointing to a button often explains the issue faster than writing another paragraph underneath the image.

The editor includes pencil and highlighter tools along with rectangles, circles, lines and arrows. You can also add text, badges, emoji and image overlays when a stronger visual marker is useful.

A logo or watermark can be added as its own image layer. Its position, size and opacity can be changed without immediately flattening it into everything else on the canvas.

Layers keep the edit flexible

Text, shapes and overlays become harder to change once everything has been flattened into one image.

Keeping them on separate layers lets you move an element forward or backward, hide it temporarily, lock its position or rename it when the canvas starts getting busy.

This becomes especially useful when a screenshot has several callouts or a campaign graphic contains text, a badge and a watermark at the same time.

Undo and redo help with normal mistakes. The before and after comparison answers a different question: whether all those edits actually made the image better.

Exporting the image

JPEG, PNG and WebP suit different kinds of output

The editor can export supported results as JPEG, PNG or WebP.

JPEG is commonly useful for photographic images where transparency is not needed. PNG uses lossless compression and can preserve transparency through an alpha channel.

WebP can use lossy or lossless compression and also supports transparency, which makes it useful for many web images where file size is part of the decision.

The quality control becomes important when the chosen output uses adjustable compression. A very low setting can reduce file size but also make text, edges or photographic detail look worse.

Check the finished image at roughly the size people will actually see it. An export can look acceptable while zoomed out in the editor and still show obvious compression once it is used on a page.

Decide what the edited file should become

Save optionUse it when
Replace SourceThe edited result should become the active file for the existing asset
Attach as VersionThe edit belongs to the same asset and the earlier version should remain available for rollback
Save as VariantYou need a related version such as another crop or social size while keeping its connection to the source
Save as New AssetThe finished image should exist as its own separate library item

Replacing the source makes sense when the edited image truly should take the place of the current one.

It is a poor choice when you still need several versions from the same original. A variant, version or separate asset gives you more room to create another crop later without trying to rebuild the source you already replaced.

Batch image work

Repeating the same edit fifty times is a different problem

A single image often needs individual judgement. A catalogue containing dozens of product images usually needs consistency instead.

The Batch Image Processing workflow handles up to 250 images in one queue under the current implementation. You can save a processing preset and apply the same setup across the selected files rather than repeating identical choices one image at a time.

A preset can carry settings such as resizing, crop behaviour, output format and target folder.

This works well for a product catalogue, article image library or campaign set where many assets need the same treatment.

Use the normal Image Editor when every image needs its own creative decisions. Batch processing makes more sense when the repeated setup is the job.

Real uses

Where the editor fits into real work

Cleaning up a documentation screenshot

A screenshot can include browser controls, empty space or unrelated parts of the screen. Crop those areas away, then add an arrow or short label if the reader needs help finding the important part. Export the finished image in the format used by the guide and keep the original if you expect another version later.

Making several social versions from one source

A campaign can need a square post, portrait creative and wide header from the same original image. Start with the relevant presets, adjust the crop for each layout, then save those outputs as variants instead of repeatedly changing the only source copy. This keeps the original available when another format is requested later.

Adding review notes without damaging the clean artwork

A client draft often needs comments directly on the image. Text, arrows or shapes can make those notes much easier to follow. Save that annotated version separately when the clean artwork still needs to remain available for the final delivery.

Preparing product and website images

A product image can be much larger than the space where a website eventually displays it. Resize it for the actual use, choose the output format and inspect the finished quality before publishing. If the same operation needs to be repeated across dozens of products, move the job to Batch Image Processing rather than rebuilding the settings for each image.

Before replacing an important image

Check the parts that are hard to undo later

  • Check the crop at the size where the image will actually appear. Small text or part of the subject can disappear even when the crop looked fine at a larger editor view.
  • Keep the source when more versions are still likely. A variant or attached version gives you a safer starting point than replacing the only useful copy too early.
  • Large canvases and custom dimensions still follow the processing limits of the editor and workspace. Check the current asset before planning unusually large output.
  • Inspect the exported file itself. Compression, transparency and visual effects can look different after the final image has been created.
Questions about Image Editor

Frequently asked questions

No. You work on the image inside the editor first, then choose how the finished result should be saved. The available save choices include Replace Source, Attach as Version, Save as Variant and Save as New Asset, so the original only becomes the active edited file when you choose the option that does that.

Yes. Supported images from your Media Library can be cropped and resized inside the editor. You can use common aspect ratios, platform presets or custom dimensions within the current editor limits.

Yes. Text can be added as its own layer, and an image such as a logo or watermark can be placed as another overlay. You can adjust its position, scale and opacity while keeping other editable elements separate.

The current editor exports supported results as JPEG, PNG or WebP. JPEG is commonly suitable for photographic output, PNG is useful when lossless output or transparency is required, and WebP gives you another web focused option with support for lossy or lossless compression and transparency.

Cropping removes part of the visible image. Resizing changes the dimensions of the image that remains. They are often used together, but they solve different problems.

Yes. The editor includes ratios and presets for layouts such as Instagram, Facebook, LinkedIn, X, YouTube and web content. Saving those results as variants or separate assets is useful when you want several crops from the same original instead of replacing the source each time.

Yes. The editor includes a before and after comparison view. This is useful when several adjustments have been applied and you want to check whether the finished version genuinely looks better than the source.

Yes. Batch Image Processing is designed for repeated work across multiple files and currently supports queues of up to 250 images under the present implementation. You can save a processing preset with repeated choices such as resize behaviour, crop settings, output format and target folder, then apply that setup to the selected images.

Next steps

Explore related image tools

For finding the original, variants and saved outputs later.

When the image is already ready and only needs a hosted URL.